Gate valves are essential components in plenty of business and domestic plumbing systems, liable for controlling the waft of fluids by using the usage of elevating or reducing a gate or wedge-formed disc. Over time, the valves might also moreover enjoy wear, corrosion, or mechanical issues that require repair to repair proper functionality. In this comprehensive manual, we can stroll you down the stairs to restore a gate valve, protect commonplace problems, troubleshoot strategies, and correct techniques. Whether you’re a professional plumber or a DIY fanatic, this guide will equip you with the understanding and competencies to cope with gate valve upkeep successfully.
Click and ‘View’ for more information.
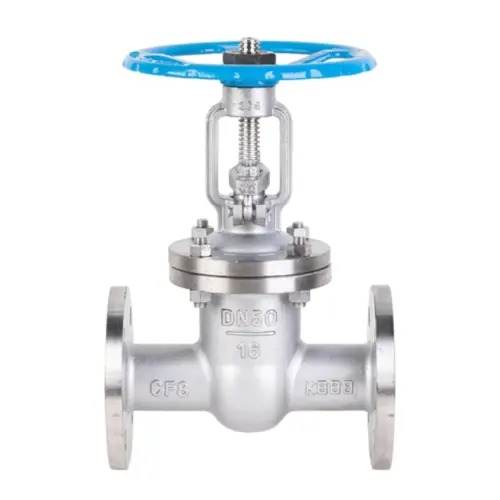
Understanding Gate Valve Anatomy
Before diving into the restoration manner, it’s far critical to familiarize yourself with the easy components of a gate valve:
Body:
The number one housing of the valve includes the inner components and provides the connection factors for piping.
Bonnet:
The cover or top is a part of the valve frame, which homes the stem and packing gland.
Gate:
The movable disc or wedge is the usual detail that controls the float of fluid through the valve. The gate is raised or decreased by way of way of using the valve stem.
Stem:
The vertical shaft that connects the handwheel or actuator to the gate. Rotating the handwheel or actuator will increase or lower the gate to open or near the valve.
Packing Gland:
A compression turning into placed around the stem to prevent leakage of fluid along the stem. It can also comprise packing fabric which encompasses graphite or PTFE.
Seats:
The sealing surfaces most of the gate and the valve frame, which ensures a first-rate seal at the same time as the valve is closed.
Common Problems with Gate Valves
Before looking to repair a gate valve, it’s critical to diagnose the underlying hassle correctly. Some not unusual troubles that could require repair encompass:
Leakage:
Leakage across the valve stem or from the valve body shows worn or broken packing glands or seat seals.
Sticking or Binding:
The gate also can furthermore end up caught or tough to feature due to particle accumulation, corrosion, or misalignment.
Incomplete Closure:
The valve may additionally fail to advantage a whole seal at the same time as closed, essential to leakage or reduced go along with the waft control.
Corrosion:
Corrosion of inner components, especially the gate and seats, can compromise the integrity of the valve and purpose leakage or failure.
Troubleshooting and Inspection
Before intending with protection, carry out a radical inspection of the gate valve to discover the source of the problem. Here are some troubleshooting steps to comply with:
Visual Inspection:
Inspect the outside of the valve for signs of leakage, corrosion, or harm. Check for seen particles or obstructions throughout the valve stem and handwheel.
Operational Testing:
Operate the valve by using turning the handwheel or actuator to open and near the valve. Note any sticking, binding, or uncommon resistance at some unspecified time within the future of operation.
Leakage Testing:
Apply pressure and take a look at the valve to test for leaks. Use a stress gauge or leak detection method to discover any leaks across the valve frame, stem, or packing gland.
Internal Inspection:
If viable, disassemble the valve to research the inner additives, which encompass the gate, seats, stems, and packing gland. Look for signs and symptoms of damage, corrosion, or damage that may require restoration or opportunity.
Repair Procedures
Based on your troubleshooting and inspection findings, hold with the nice repair tactics:
Packing Gland Adjustment:
If the valve is leaking across the stem, modify the packing gland to compress the packing material and create a tighter seal. Use a wrench to tighten the packing gland nut incrementally till leakage stops.
Gate and Seat Refurbishment:
If the gate or seats show signs and symptoms and symptoms of damage and tear or corrosion, get rid of the gate from the valve frame and investigate the sealing surfaces. Use emery material or a pleasing-grit abrasive to cast off corrosion and restore smoothness to the gate and seats. Replace any broken or excessively worn components as preferred.
Debris Removal:
If the valve is sticking or binding because of particle accumulation, disassemble the valve and smooth all internal additives very well. Use a wire brush, solvent, or compressed air to take away particles from the gate, seats, stem, and valve frame. Lubricate transferring factors with an appropriate lubricant to make certain smooth operations.
Replacement of Damaged Parts:
If maintenance isn’t sufficient to restore the right functionality, bear in mind changing broken or worn components which encompass the gate, seats, stem, or packing gland. Ensure that alternative additives are well-matched with the valve version and specifications.
Reassembly and Testing
After finishing the vital maintenance, reassemble the gate valve cautiously, making sure that each component is well-aligned and tightened. Perform a final inspection and operational check to affirm that the valve capabilities are efficient and no leaks are present. If crucial, regulate the packing gland or make greater changes to accumulate maximum ideal overall performance.
Preventive Maintenance and Care
In addition to repairing gate valves even as troubles arise, implementing a preventive maintenance application can assist in increasing the lifespan of your valves and limit the want for preservation. Here are a few preventive renovation guidelines to preserve your gate valves in essential scenarios:
Regular Inspections:
Conduct everyday inspections of gate valves to test for signs and symptoms of wear and tear and tear, corrosion, or leakage. Look for any abnormalities in valve operation, collectively with sticking or binding, and deal with them properly away.
Lubrication:
Proper lubrication of transferring additives is critical for smooth valve operation and sturdiness. Apply lubricant to the stem, gate, and distinctive important components as recommended by the manufacturer.
Cleaning:
Keep valve additives easy and free of particles to prevent interference with operation. Regularly do away with dirt, rust, or scale buildup from valve internals using appropriate cleansing techniques.
Pressure Testing:
Periodically carry out stress checks on gate valves to confirm their integrity and leak-tightness. This allows choosing out capability problems earlier than they enhance into steeply-priced problems.
Seal Replacement:
Replace worn or broken seals, gaskets, and packing cloth as part of ordinary renovation. Proper sealing is vital for stopping leakage and retaining the pinnacle of the road valve’s general overall performance.
Operational Checks:
Regularly function gate valves to make certain they open and close without difficulty without resistance. Address any problems with valve operation at once to save you from similar harm or malfunction.
Common Repair Techniques
While a few gate valve safety also can require professional data, many common issues can be addressed with simple repair techniques. Here are a few more repair strategies generally used for gate valves:
Seat Grinding:
If the valve seats are worn or broken, seat grinding can assist in restoring proper sealing. Use a seat grinding tool to eliminate imperfections and create a clean, flat ground for quality contact with the gate.
Stem Replacement:
If the valve stem is bent, corroded, or otherwise broken, an alternative can be essential to ensure the right operation. Remove the antique stem and install the latest one in keeping with manufacturer specs.
Gate Refurbishment:
In instances in which the gate is worn or corroded, refurbishment may be a choice. Remove the gate from the valve body and refinish the sealing surfaces to restore easy operation and proper sealing.
Packing Replacement:
If the packing gland is leaking notwithstanding adjustment, a substitute of the packing fabric may be critical. Remove the antique packing fabric and set up new packing earrings or packing rope to create a first-rate seal throughout the stem.
Conclusion: View More
In conclusion, the right safety and properly timed preservation are crucial for making sure the dependable performance of gate valves in enterprise and domestic plumbing systems. By implementing a proactive preservation application and addressing troubles straight away with suitable restoration strategies, you could increase the lifespan of your gate valves and decrease downtime and expensive upkeep. View extra resources and facts on gate valve safety and restore to growth your records and skills in valve care and optimization. With the right care and hobby, gate valves can keep functioning effectively and contribute to the smooth operation of your fluid management structures.
` z